How to making function save and load data in zkoss server-side
Terkadang fungsi save pada pembuatan web aplikasi sangat berpengaruh saat user melakukan penyimpanan data. Seberapa cepat data yang di simpan dapat di tampilkan kembali pada Grid atau di layer front end. Sehingga terlihat proses yang terjadi dalam penyimpanan cepat.
Kali ini saya memcoba membuat save atau penyimpanan data customer dan menampilkannya tanpa harus melakukan penyimpanan pada database tertentu.
Proses ini dapat di gambarkan sebagai berikut :
Gambar artcitecture proses
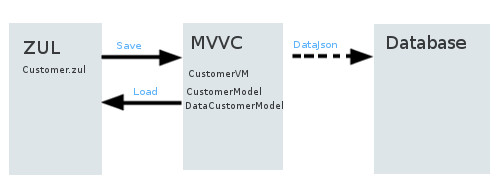
Front end yang di gunakan adalah frontend dengan menggunakan
- zkoss server-side proses.
Integrated Development Envirotment (IDE) yang digunakan :
- IDE Eclipse.
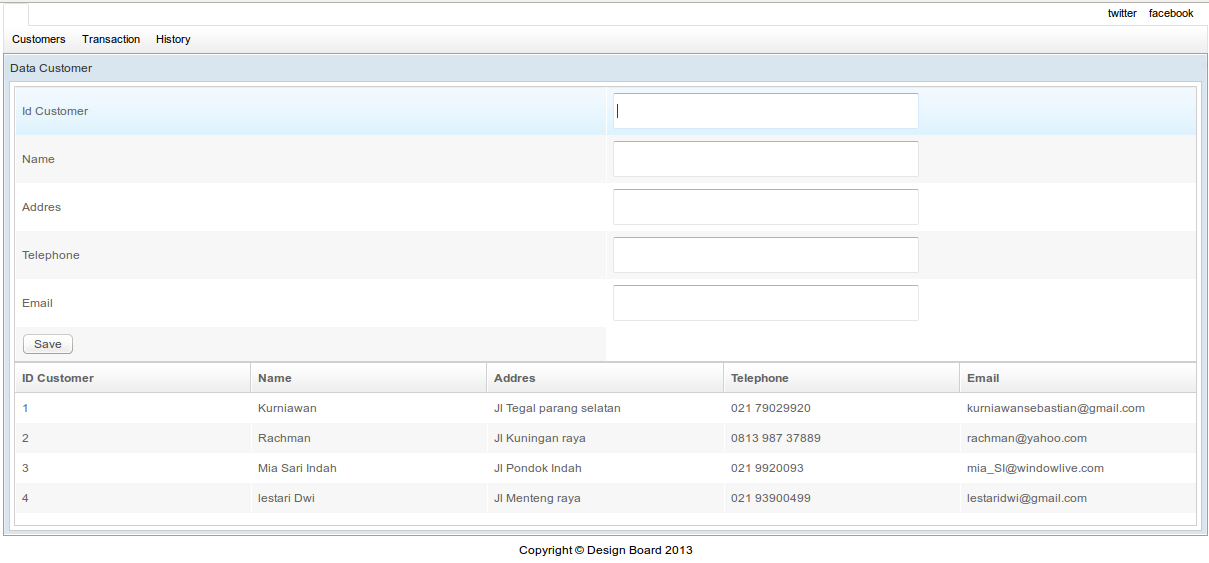
Langkah pertama saya membuat tampilan depan dari data yang akan diinput oleh user. Form Customer dengan field idCustomer, name, Alamat, telepon, email, button save, dan di bagian bawah dari form saya tambahkan grid untuk penampungan data customer.
bentuknya seperti dibawah ini :
Langkah selanjutnya saya akan membuat bagian dari proses bisnis kerja data dengan membuat model class, data model class, view model class. Sebelum kita buat class tersebut kita buat suatu package project dalam directory src ex : com.pos.customer
Model Class.
Buat package com.pos.customer.model
right click pada package pilih new > class > CustmerModel.java
lalu input field yang dibutuhkan :
private String idCustomer;

    private String nameCustomer;

    private String addres;

    private String telepon;

    private String email;
Buat method CustomerModel dengan parameter sesuai dengan field yang telah dibuat.
public CustomerModel (String idCustomer, String nameCustomer, String addres, String telepon, String email) {

    	this.idCustomer = idCustomer;

    	this.nameCustomer = nameCustomer;

    	this.addres = addres;

    	this.telepon = telepon;

    	this.email = email;

    }
tahap terakhir buat set dan get pada class CustomerModel.
public String getIdCustomer() {

		return idCustomer;

	}

	public void setIdCustomer(String idCustomer) {

		this.idCustomer = idCustomer;

	}

	public String getNameCustomer() {

		return nameCustomer;

	}

	public void setNameCustomer(String nameCustomer) {

		this.nameCustomer = nameCustomer;

	}

	public String getAddres() {

		return addres;

	}

	public void setAddres(String addres) {

		this.addres = addres;

	}

	public String getEmail() {

		return email;

	}

	public void setEmail(String email) {

		this.email = email;

	}

	public String getTelepon() {

		return telepon;

	}

	public void setTelepon(String telepon) {

		this.telepon = telepon;

	}
Hasil keseluruhan source code :
public class CustomerModel {
private String idCustomer;
private String nameCustomer;
private String addres;
private String telepon;
private String email;public CustomerModel (String idCustomer, String nameCustomer, String addres, String telepon, String email) {
this.idCustomer = idCustomer;
this.nameCustomer = nameCustomer;
this.addres = addres;
this.telepon = telepon;
this.email = email;
}public CustomerModel() {
// TODO Auto-generated constructor stub
}public String getIdCustomer() {
return idCustomer;
}
public void setIdCustomer(String idCustomer) {
this.idCustomer = idCustomer;
}
public String getNameCustomer() {
return nameCustomer;
}
public void setNameCustomer(String nameCustomer) {
this.nameCustomer = nameCustomer;
}
public String getAddres() {
return addres;
}
public void setAddres(String addres) {
this.addres = addres;
}
public String getEmail() {
return email;
}
public void setEmail(String email) {
this.email = email;
}
public String getTelepon() {
return telepon;
}
public void setTelepon(String telepon) {
this.telepon = telepon;
}
}
Lalu buat DataCustomerModel
source code seperti dibawah ini :
import java.util.ArrayList;
import java.util.List;import org.zkoss.bind.annotation.Command;
import org.zkoss.bind.annotation.NotifyChange;import com.idebagussejahtera.pondsdemo.model.CustomerModel;
/**
* @author trachman
*
*/public class DataCustomerModel {
List customerDataList = new ArrayList();
CustomerModel customerModelData = new CustomerModel();private CustomerModel customerModdelpriv;
private List customerModelDataList;public CustomerModel getCustomerModelData() {
return customerModelData;
}public void setCustomerModelData(CustomerModel customerModelData) {
this.customerModelData = customerModelData;
}public List getCustomerDataList() {
return customerDataList;
}public void setCustomerDataList(List customerList) {
this.customerDataList = customerList;
}public DataCustomerModel () {
initData();
String addres =null;
String idCustomer =null;
String nameCustomer = null;
String email =null;
String telepon =null;
System.out.print("cek this line DataCustomerModel");
toSave(idCustomer, nameCustomer, addres, telepon, email);
}
/**
* initData untuk data yang diparsing ke dalam database. data sebagian menggunakan data dummy
*/
public void initData() {
// TODO Auto-generated method stub
if (!customerDataList.isEmpty())
customerDataList.clear();customerDataList.add(new CustomerModel("1","Kurniawan","Jl Tegal parang selatan","021 79029920", "kurniawansebastian@gmail.com"));
customerDataList.add(new CustomerModel("2","Rachman", "Jl Kuningan raya ", "0813 987 37889","rachman@yahoo.com"));
customerDataList.add(new CustomerModel("3","Mia Sari Indah","Jl Pondok Indah ","021 9920093","mia_SI@windowlive.com"));
customerDataList.add(new CustomerModel("4","lestari Dwi","Jl Menteng raya","021 93900499","lestaridwi@gmail.com"));}
@NotifyChange({"customerModdelpriv","customerModelDataList"})
@Command
public void toSave( String idCustomer, String nameCustomer, String addres, String telepon, String email) {idCustomer = customerModelData.getIdCustomer();
nameCustomer = customerModelData.getNameCustomer();
addres = customerModelData.getAddres();
telepon = customerModelData.getTelepon();
email = customerModelData.getEmail();
System.out.println("idCustomer :"+idCustomer);
System.out.println("naeCustomer : "+nameCustomer);customerModelData.setIdCustomer(idCustomer);
customerModelData.setNameCustomer(nameCustomer);
customerModelData.setAddres(addres);
customerModelData.setTelepon(telepon);
customerModelData.setEmail(email);customerDataList.add(customerModelData);
System.out.print("customerDataList :"+customerDataList);}
/**
* @return the customerModdelpriv
*/
public CustomerModel getCustomerModdelpriv() {
return customerModdelpriv;
}/**
* @param customerModdelpriv the customerModdelpriv to set
*/
public void setCustomerModdelpriv(CustomerModel customerModdelpriv) {
this.customerModdelpriv = customerModdelpriv;
}/**
* @return the customerModelDataList
*/
public List getCustomerModelDataList() {
return customerModelDataList;
}/**
* @param customerModelDataList the customerModelDataList to set
*/
public void setCustomerModelDataList(List customerModelDataList) {
this.customerModelDataList = customerModelDataList;
}}
Lalu buat class ViewModel dengan CustomerVM.java
souce code seperti dibawah ini :
import java.util.List;import org.zkoss.bind.annotation.Command;
import org.zkoss.bind.annotation.NotifyChange;import com.idebagussejahtera.pondsdemo.model.CustomerModel;
import com.idebagussejantera.pondsdemo.model.interfaces.DataCustomerModel;public class CustomerVM {
DataCustomerModel customerDataModel = new DataCustomerModel() ;
private CustomerModel customerModelPriv ;
private List listCstModelPriv;public DataCustomerModel getCustomerDataModel() {
return customerDataModel;
}
public void setCustomerDataModel(DataCustomerModel customerDataModel) {
this.customerDataModel = customerDataModel;
}@NotifyChange({"customerModelPriv", "listCstModelPriv"})
@Command
public void saveCustomer(String idCustomer, String nameCustomer, String addres, String telepon, String email) throws Exception {
//customerDataModel;
System.out.println("cek this line "+idCustomer);customerDataModel.toSave(idCustomer, nameCustomer, addres, telepon, email);
}
/**
* @return the customerModelPriv
*/
public CustomerModel getCustomerModelPriv() {
return customerModelPriv;
}
/**
* @param customerModelPriv the customerModelPriv to set
*/
public void setCustomerModelPriv(CustomerModel customerModelPriv) {
this.customerModelPriv = customerModelPriv;
}
/**
* @return the listCstModelPriv
*/
public List getListCstModelPriv() {
return listCstModelPriv;
}
/**
* @param listCstModelPriv the listCstModelPriv to set
*/
public void setListCstModelPriv(List listCstModelPriv) {
this.listCstModelPriv = listCstModelPriv;
}}
setelah selesai dibagian MVVC dari zkoss lalu kita tambahkan penghubung antara MVVC ke dalam zul zkoss dengan cara :
untuk dapat menghubungkan antara MVVC ke zul tambahkan apply component dan viewModel component contoh seperti dibawah ini :
apply=”org.zkoss.bind.BindComposer” viewModel=”@id(‘vm’) @init(‘com.pos.administrator.CustomerVM’)”>
component apply adalah untuk menggunakan class lib zkoss yaitu class BindComposer kelas ini telah dibuat oleh Firemwork zkoss.
lalu untuk viewModel adalah memiliki fungsi untuk memanggil class dari MVVC yaitu class CustomerVM.
Lalu untuk fungsi save lakukan penambahan component pada parent form
Ex :
<grid form=”@id(‘itm’) @save(vm.customerDataModel.customerModelData, before=’saveCustomer’)”>
<columns>
<column></column>
<column></column>
</columns>
<rows>
<row>
<label value=”Id Customer” ></label>
<textbox id=”idCustomer” width=”300px;” height=”30px” value=”@bind(itm.idCustomer)” ></textbox>
</row>
<row>
<label value=”Name”></label>
<textbox width=”300px” height=”30px” id=”name” value=”@bind(itm.nameCustomer)”></textbox>
</row>
<row>
<label value=”Address” ></label>
<textbox width=”300px;” height=”30px” value=”@bind(itm.addres)”></textbox>
</row>
<row>
<label value=”Telephone”></label>
<textbox width=”300px;” height=”30px” value=”@bind(itm.telepon)”></textbox>
</row>
<row>
<label value=”Email”></label>
<textbox width=”300px” height=”30px” value=”@bind(itm.email)”></textbox>
</row>
<row>
<button id=”btnSave” onClick=”@command(‘saveCustomer’)” label=”Save”></button>
</row>
</rows>
</grid>
Lalu untuk dapat menampilkan data pada saat save terjadi dengan fungsi load di grid seperti code yang di bold:
<grid model=”@load(vm.customerDataModel.customerDataList)” >
<columns>
<column label=”ID Customer”/>
<column label=”Name “/>
<column label=”Addres”></column>
<column label=”Telephone”></column>
<column label=”Email”></column>
</columns>
<template name=”model”>
<row>
<label value=”@load(each.idCustomer)”></label>
<label value=”@load(each.nameCustomer)” ></label>
<label value=”@load(each.addres)”></label>
<label value=”@load(each.telepon)”></label>
<label value=”@load(each.email)”></label>
</row>
</template>
</grid>
Memasukan fungsi load pada setiap value yang berada di grid yang menampilkan data-data.
Lalu proses selesai dan test aplikasi
Input data baru hasil dapat dilihat di bawah ini :

i am here
Real Time

280710 Visit


